Thursday, December 24, 2009

MERRY CHRISTMAS & A HAPPY NEW YEAR

So this will probably be my last blog post for 2009!
We are heading off on holidays to Melbourne tomorrow for a few weeks to catch up with Anthony's family!
I would like to wish everyone a MERRY CHRISTMAS and a safe and HAPPY NEW YEAR.
I look forward to catching up again in 2010.

Thanks..Jules

Pattern Pack II Designer Series Papers

As a Level 1 Hostess Gift the Patterns Pack II Designer Series Papers 6x6 pad is great value! I've always loved the 6x6 pads of papers put out by different companies, I think they are great value, especially for card makers. The size of them are perfect for card makers as you are not left over with huge sheets of paper if you just want a small section to use on a card front.

I've had this pad here of months and have never done much with it. So the other day when I was cleaning and changing my craft room around I can across this pad of papers and thought I would have a go at making some cards with it!

Very simple design, as the main focus is the papers. I used the same patterned papers and cardstock for all 4 cards and just used my 5 Petal Flower Punch. I added some of the Designer Buttons to finish off the flower centres with some linen thread. I didn't add any sentiments to these cards as I thought I might bundle them up, add some envelopes and give as a Thank You Gift and that person can add what suits them!


Thanks..Jules

Wednesday, December 23, 2009

Birthday Gifts

A few weeks ago it was my good friend Helen's Birthday, so as I have time on my hands at the moment I decided to make her something special for her Birthday!
We live in different states in Australia, so I had to post this to her and I was a little worried about it getting broken as the frame has glass in it. It never got to her in time for her Birthday but she received it a few days later and I think she was suprised when she opened it!

The frame was a 8x8 Frenchville brand which I purchased from my local Scrapbooking Shop, the letter "H" was from Loot, I've used these letters before and are quite nice to use plus they are already painted white, so it cuts out a bit of time in decorating them! I used the papers from the Sweet Nothings Simply Scrappin Kit from Stampin' Up! as well as the new Butterfly Punch. I was unsure after I made it if she would like the colours I used, but she said she Loved everything about it!
Oh, and here is the card I made to go with it also!


Thanks..Jules

Tuesday, December 22, 2009

My Gift Card Holders

Also in the past week I have been busy with Christmas Shopping and trying to fit everything in before we go away!
As most of our family is spread out over Australia, I needed to get things posted so that hopefully they arrived at there destinations in time for Christmas!
Each year I think it gets harder to buy for family and friends when they live so far away and so you don't know really know what they already have, so this year I opted for the easy way out for some of our family and purchased Gift Cards from various stores. That was still hard trying to decide which store suited each person!

But instead of just sending the Gift Cards as they were from the shops, I made my very own Gift Cards Holders to present them in.
Each one is different and I tried to keep in mind if they were for male or female, so I didn't want to male ones looking too pretty and girly!!

I have been purchasing some Copic Markers over the past few months, so I wanted to have a go at using them also (don't look to closely),I was happy with the end results with most of them.
The main Stamp Set I used was Holiday Line Up. I have always loved this set, I think they are all so cute and I love the expresions on the faces of them all!!

I used assorted Christmas Designer Series Papers and co ordinating Cardstock. Also on each Gift Card Holder, I purchased some little magnets that I have put on the underside of the flap and the base to hold them securely closed.

I was happy with the end results, and probably could have just sent them like this, but I felt I couldn't just send this to each person, so I went to my favourite Packaging Place and found these boxes that the Gift Card Holders fitted nicely into and then I lined each box with tissue paper and wrapped them up nicely.
I love the 1 1/4 inch Striped Grosgrain Ribbon that was in our Spring Mini Catalogue, so with Christmas in mind I had to order extra!

Below are just a few of the Gift Card Holders I made!


So here are my wrapped Gift Card Holders, all finsihed and posted last week , so hopefully they arrive in time for Christmas!


Thanks..Jules

Christmas Clutch Bags

I've been busy over the past week making Christmas Gifts for family and friends.
While we were at Regional last month, one of the demonstrators from the US shared with us how to make this cute little clutch purse. I gave her my contact details and she sent me the instructions.
They are really easy to make, and the original design uses 1 sheet of 12x12 Designer Series Paper, plus some ribbon to hold it in place. Although this was already cute, I decided to slightly adjust it and add some handles and dress it up a little!


I had some papers floating around, not sure of the company, so I made some of these for the girls in Anthony's office as a little Christmas Gift and I filled them with yummy Favourite Chocolates! They loved them!


The second batch were for some of my fellow "Paper Angels" demonstrators. Last week I went down to Liz's (my upline) for a brainstorming session, and as there were only a few attending I decided to make a little something for them.
This time I used assorted Stampin' Up! Designer Series Papers, coordinating cardstock and a little ribbon and bling, I also filled these with yummy Favourite Chocolates. It is also a great way to use up some of your retired 12x12 Designer Series Papers.

A girl can never have too many bags!!
Thanks..Jules

Friday, December 18, 2009

Animal Stories and Tall Tales DSP

As most of you know here in Australia we recently got a new Summer Mini Catalogue (which started on the 1st December and runs until the 31st March). Earlier this month I held a Summer Mini Catalogue Launch, so I was busily trying to come up with designs using some of the new Stamps and product so I could show my customers.
Animal Stories and the Tall Tales Designer Series Paper were one of my least favourite sets, and I wasn't even going to purchase it. Well that was until I had seen some of the cards that Helen had been making. So inspired by Helen's cards, I ended up purchasing this set and below are a few cards that I made using this set.
Sorry about the photos, but I was too lazy to take the cards out of the plastic bags to photograph them and I haven't gotten back around to re-photograph them!!


Thanks..Jules

Monday, December 14, 2009

STAMP SALE NOW ON!!

Huge Stamp Sale - whilst stocks last

Stampin' Up! have announced today, the first ever Australian Inventory Sale. If your looking for a bargin, then check this out as some stamp sets are 50% off (Alphabet ones in particular!)
The sale starts tomorrow, 15th December 2009 and runs until the 24th January 2010 but only whilst stocks last.

Don't miss out. You can check out the stamps, papers, glitter and much more that are on sale here


Email or call me today to place your order.

Thanks..Jules

Tuesday, December 08, 2009

Busy, Busy last few days...

FRIDAY: Summer Mini Catalogue Launch
On Friday I held my Summer Mini Catalogue Launch.
I decided to hold 2 sessions, 10am and then again at 6pm. Although I didn't get alot of people attend due to other commitments, those who attended said they had a good time and they all walked away with prizes!!

Just as a little Thank-You gift for attending, I made these cute little goodie bags which contained yummy shortbread and candy canes!

Below are a few photos of my display board and sample table plus some of the prizes.
I made up Show Bags which contained a copy of the Summer Mini Catalogue, a small stamp, lollies and a few other bits and pieces.


SATURDAY: Mini Trifold Scrapbook Album

On Saturday we had some friends from the Gold Coast here as Nicole wanted to make a special gift for her friend Anita.
Nicole & Anita had worked out that this year they have been friends for 30 years. So to mark this special occasion they were going to have a Anniversary Party but as usual they got busy and this never happened.
The last time I was down visiting Nicole, I showed her a class that I had run which was the Mini Trifold Scrapbook Album and she loved it, which got her thinking that she could make one for Anita as a Special Anniversary Gift, by adding some photos of the two of them over the years.

The traditional Anniversary gift for the 30th wedding anniversary is pearls, whilst the modern anniversary gift for the 30 year anniversary is diamonds. So with this in mind she wanted to combine the both in her Trifold Album and she wanted to use the Bella Bleu Designer Series Papers as it has a elegant feel about it (when you see this paper close up rather than in the cataolgue you will love it)we matched it up with Kraft, Not Quite Navy and Very Vanilla Cardstock and then she added Pearls and Silver Rhinestones.

The final result was stunning!! We even made a gift box to match!
I have included a few photos but they aren't the greatest but you get the general idea and of course it looks so much better in real life!! Nicole was absoultely rapped with what she achieved.


SUNDAY: Anthony's Birthday/ Xmas BBQ
On Sunday afternoon I had arranged a BBQ for Anth's Birthday plus a bit of a Xmas get together, nothing huge, just family and a few close friends!
During the day here on the coast it was stinkin hot, they had predicted thunder storms also, but too hot to be inside!
We are wanting to build a deck off the side of the house, so as a bit of fun I decided to move the outdoor table and chairs out onto the grass area to where the deck will go, as this has the best view over town, down the valley with a bit of a ocean view and a nice breeze! Plus there is heaps more room than on the verandah!

So I have put in a few photos from the day, just of my table, his Bomber Cake, Anthony just after he had blown out the candles and just as the clouds were rolling in!
We ended up having the cake and dessert inside because just as we all sat down to eat dinner, the clouds came in and got really black and we had a few spots of rain, so we all quickly ate, then cleaned up and moved everything back inside, then of course the storm blew itself away!!

It was a very relaxing afternoon and was great to catch up after a busy year for us all!


Thanks...Jules

Wednesday, December 02, 2009

My Christmas Organiser

Are you sick of seeing my Christmas projects yet??
Well I have another one to show you that I made a few weeks ago, but never got around to photographing it.
This is my Christmas Organiser, it is a little too late to start using it this year, but at least I will be ready for next Christmas!
I started out with a SU On Board Art Journal (107065 $16.95) which has been sitting in my cupboard for about a year and I teamed it up with the Holiday Treasures Designer Seriers Papers and used coordinating colours.
I've divided the journal into sections so I can keep track of things to do,gifts to buy, christmas card lists, etc. At the very back of the journal I have also included a pocket, so you can keep receipts incase you need to return gifts after Christmas.


Supplies Used:
Stamp Sets:Snow Swirled, Seasons of Joy, Christmas Classics
Cardstock:Ruby Red, Whisper White,Old Olive
Designer Series Papers:Holiday Treasures
Inks:Ruby Red, Old Olive
Punches:Spiral, Round Tab, 1" Circle Punch
Other: On Board Art Journal,Pearls,Rub ons, Stampin Dimensionals

Thanks..Jules

Tuesday, December 01, 2009

Brisbane Training Day Swaps

On Saturday I attended the SU Training Day in Brisbane, I had a great day. I walked away with my head spinning, as you normally do when you attend these days. You learn so much from the speakers and other Demonstrators. You try and write everything down, but that's not always possible as your trying to watch, listen and take photo's! When you get home and sit down and go back over your notes you realise that they don't make any sense at all!

As I mentioned in a earlier post I only decided on the Wednesday to make them so I had a busy few days. I ended up making 28 in total, so I was happy with getting them done in two days.
The swaps that I made were very easy but effective (I thought so). I did the same design for them all but I used a few different colour combinations and changed the Designer Series Papers. I used some Designer Series Papers that were from the Current 2009/2010 Catalogue and also the Spring Mini (as it was still cuttent on the 28/11). Below are some of my swaps in the different colours. The time consuming part was distressing all the circles, I tried using my distressing tool but in the end it is was easier and quicker to use my fingernail!


I received some beautiful swaps in return and some of them were using product from the New Summer Mini Catalogue, it's great to see other peoples styles and designs, I got some cute mini boxes and bags as well, some people put sooo much work into their swaps!
Thanks..Jules

Thursday, November 26, 2009

Easel Card

Another sneak peak using more product from the New Summer Mini Catalogue. These easel cards have been doing the rounds on various blogs, so I thought I would have a go at making one also.
All of the photos below are of the same card, I just photographed it from a few different angles as I wanted to show you different views so you get why it is called a easel card.
They are very easy to make, it's all in the folding!! My finished card is 4x4 inches when folded flat.
Out of one sheet of 12x12 cardstock you can make 3 cards. To make the card stand like a easel, you need something along the bottom piece which acts like a wedge. On this card I just used another piece of paper in which I stamped my sentiment and then I placed Stampin Dimensionals underneath to raise it and it allows the easel to stay in place. I have seen other cards that have used items like buttons, ribbons and brads which is enough to act as a wedge.


The Summer Mini is jammed packed with heaps of new Stamps and Accessories and covers everything from Valentine’s Day to Easter, 2 NEW Punches, a new Cutting Tool plus heaps more gorgeous Papers and Accessories.

Thanks..Jules

Wednesday, November 25, 2009

Another Sneak Peak

So here is another card I made using some of the new products from the Summer Mini Catalogue!
I won't list the items I have used, as I don't want to spoil the suprise for others who have to wait until the Summer Mini Catalogue is available on the 1st of December (I know some of you all ready have copies).


I have been busy this afternoon in my craft room making cards! So far I have made 22!
16 of the 22 are actually swaps, as on Saturday I am off to Brisbane for a Stampin' Up! training day. I was undecided up until lunch time today as to do swaps or not but the more I thought about it, the more I thought I should! (nothing like leaving it to the last minute).
I thought I would try and do about 30, so half way there! I am doing all the same base design, but I am changing all the colours and using different Designer Series Papers. I'm happy with what I came up with. I will post photos of my swaps after Saturday.

Thanks..Jules

Monday, November 23, 2009

Bella Bleu

Last week I posted 4 cards that I made using the Bella Bleu Designer Series Papers, well here is a photo of all 4 of them together!


I'll pop back later with another Sneak Peak from the Summer Mini Catalogue.
Thanks..Jules

Sunday, November 22, 2009

Shhh...

One advantage of being a Stampin'Up! Demonstrator is that we get to see New Catalogues or Mini Catalogues about a month in advance before our customers do. We are able to pre-order some of the products so we are able to get a head start on making samples that we can show our customers and let them what to expect!

So the New Summer Mini Catalogue will be available to purchase from on the 1st of December.

From now until the 1st of December, I will be posting Sneak Peaks of samples that I have been making over the past few weeks!

If you would like to receive your own copy of the New Summer Mini, please contact me.

Don't these colours just scream Summer!


You can probably tell from my usual style and colours, that I tend not to use alot of the colours from the Bold Bright Colour Family.
Well with one of the new Designer Series Paper Packs, Kaleidoscope, which is in the New Summer Mini, it certainly has taken me out of my comfort zone and over the past few weeks has pushed me to try new colour combinations. All of the colours above all match perfectly with it! They are so bright and fresh.

Thanks..Jules

Friday, November 20, 2009

Card 4 from Bella Bleu

Well here is the final card in the set I made using Bella Bleu Designer Series Papers.
This card is a little different to my standard cards that I make, and this will fit into a SU C6 Medium envelope.


Supplies Used:
Stamp Sets: Fresh Cuts
Cardstock: Not Quite Navy, Very Vanilla
Designer Series Paper: Bella Bleu
Inks: Note Quite Navy
Punches: Scallop Square, Horizontal Slot
Other: Cuttlebug, Borderbilities, Wide Satin Ivory Ribbon

Thanks..Jules

Thursday, November 19, 2009

Card 3 from Bella Bleu

Ok, so for card 3 from this set.This would have to be my least favourite of the 4.
I think it is a little too busy. I don't like the row of Pearls on it, but when I tried to remove them it tore the paper a little, so they had to stay, so if you can picture this card without the row of Pearls!!


Supplies Used:
Stamp Sets: Fresh Cuts
Cardstock: Kraft, Not Quite Navy
Designer Series Paper: Bella Bleu
Inks: Not Quite Navy
Punches: Scallop Oval, Large Oval,1/2 inch Circle
Accessories: Taffeta Ribbon-Kraft,Build A Brad Pewter
Other: Cuttlebug, Borderbilities, Pearls

Thanks..Jules

Wednesday, November 18, 2009

Card 2 using Bella Bleu

Another card I made using the Designer Series Paper Bella Bleu. There are 4 cards in total that I made in this set, so I might actually make up a nice gift box and give them as a gift!
This is quite a simple card, I just love patterns on the paper they have such a elegant feel to them and the colours all go perfectly together.


Supplies Used:
Stamp Sets: Fresh Cuts
Cardstock: Kraft, Very Vanilla and Not Quite Navy
Designer Series Paper: Bella Bleu
Inks: Not Quite Navy
Punches: Scallop Square, 1 1/4" Square and Eyelet Border
Accessories: Taffeta Ribbon-Kraft

Thanks..Jules

Tuesday, November 17, 2009

Bella Bleu

Now I must admit when I first saw the Bella Bleu Designer Series Paper in the current Catalogue,it wasn't one that I knew I had to get straight away. I recently purchased a pack and when I laid it out with the co ordinating cardstock and ribbon I was actually suprised at how much I liked it!

So, I've been playing with this DS pack and over the next few days I will post all of them here so you can have a look and let me know what you think! They aren't my usual style but sometimes you need to break away and do something a little different!


Supplies Used:
Stamp Sets:Sense of Time (Spring Mini Catalogue)
Cardstock:Note Quite Navy, Very Vanilla
Designer Series Paper:Bella Bleu
Inks:Not Quite Navy
Other: Cuttlebug, Nestabilities and Wide Satin Ribbon

Thanks..Jules

Monday, November 16, 2009

Christmas Gift Tag Accordian Book


The original idea for this Christmas Gift Tag Accordian Book was from
K.Werner Design
When I saw it I thought it was a great idea. I also made mine in a Christmas theme but you could very well change it and fill it with Gift Tags for all different occasions eg; Birthday Tags.
You can keep it quite simple by reducing the amount of stamp sets that you use also.

Supplies Used:
Stamp Sets: Holiday Line Up Stamp Set,Spotlight on Christmas,Snow Swirled,Christmas Classics
Cardstock: Baja Breeze Textured Cardstock, Whisper White Textured Cardstock
Chocolate Chip Cardstock, Real Red Cardstock, Old Olive Cardstock
Pattern Papers:Ski Slope Designer Series Paper
Inks:Stazon Black and White,Old Olive, Read Red
Punches:3/4" circle punch,
Other Accessories:Real Red 5/8" Grosgrain Ribbon,Stampin Write Markers:Basic Black,Real Red, Old Olive, Chocolate Chip and uni-ball Signo White gel pen, Earth Elements Water Colour Crayons, Aqua Painter
Other:Cuttlebug,Assorted Nestibilities and Twine

Thanks..Jules

Friday, November 06, 2009

Inexpensive Gifts


I love giving gifts to friends, work colleuges and neighbours for Christmas. Every year a few weeks prior to Christmas I try and spend a few days in the kitchen making yummy homemade treats like Rum balls, Apricot balls, (my extra special) Rocky Road, Shortbread, etc and then packaging them up in celo bags and giving each person a small basket full of yummy Christmas treats. Hopefully this year I will be able to do the same. I know this is not possible for some of us!
I also like to have some gifts on hand incase I have forgotten someone or we need to give any last minute gifts to friends who call in.

I have been starting to buy a few inexpensive (pre packaged) food itmes from places like Big W, Woolies and Coles in which I have taken the original boring labels off (or decorated directly over the top) and decorated them with some gorgeous Designer Series Papers and embellishments from Stampin' Up!

Most of these food items were under $10.00, so these could be great gift ideas for neighbours. I love items in tins and bottles as these are easy to decorate.
The items in the photo above are Tinned Biscuits, Jars of Hardboiled Lollies, a bottle of Fruit and Nut Chocolates and a block of Cadbury Chocolate (with the purple packaging removed and then covered the alfoil block). I have also decorated a plain white gift bag with some patterned papar and ribbon to give the gifts in, and again they are more likely to reuse the gift bag, then rip off the wrapping paper!

I have used the Ski Slope Designer Series Papers (112994 416.95) the Tree Trimmings stamp set (116893 $24.95). I love the 1 1/4 inch Candy Cane Striped Grosgrain Ribbon (113099 $19.95)which are all from the Spring Mini (available until 30/11/09).

Next time your shopping, have a look at the supermarket for some ideas, I'm sure there is something that will catch your eye!

Thanks..Jules

Monday, November 02, 2009

Christmas Card Workshop


Here are some cards that I made for a Christmas Card Workshop which was held last weekend.
Everyone got to make a Treat Box, Notebook Holder and 6 Christmas Cards. Everyone used the Ski Slope Designer Series Paper and Tree Trimmings Stamp Set from the current Spring Mini Catalogue.
I love the bright colours in the Ski Slope DS Paper, and that Stampin' Up! have broken away from the "Traditional Red and Green" Christmas colours. (112994 $16.95)
The Tree Trimmings stamp set is so versitile, not only use it for Cards, but it's great to use for making your Christmas Tags, add a few diffent shapes, colours and layers with Stampin' Dimensionals and tadah! "stunning". (116893 $24.95)

** which reminds me, the Mini Spring Catalogue finishes at the end of November, so if you still haven't purchased your favourite Products, then time is running out! Don't forget that some of these sets and items may not be available again, so don't miss out!)

Thanks..Jules

THE PAMPERED STAMPER

It's been ages since I have posted anything on my Blog. I have been flat out doing other things which have been keeping me away from updating and posting! I have done some cardmaking lately, but unfortunately it has been NON Stampin' Up! related things so I haven't posted them as I try and keep my Blog just for my Stampin' Up! Projects and samples. October was a blur for me, with somthing happening every weekend, from Workshops, Cancer Awareness Fundraising Day, Christenings, etc.

The Pampered Stamper is an idea Tina and I have been busy with trying to get up and running, and finally we are able to offer this to our Friends, Customers and Family. This is available to anyone on the Sunshine Coast, (locals or visiting), just contact either Tina or Myself. (There is a link to The Natural Beauty Retreat on my sidebar)

THE PAMPERED STAMPER

Ladies,
You are invited to spend a day of fun, creativity and total selfishness pampering with friends …

Saturday 21st November OR Saturday 5th December 10am – 4 pm

@ The Natural Beauty Retreat:106 Thrushs Road, Dulong

Scrumptious Morning, Afternoon Tea and Lunch is provided

Enjoy and relax whilst sitting on the deck looking out over the beautiful hinterland on the Sunshine Coast, in a Peaceful and Tranquil setting.

Cost for the day is $110.00 per person

The Day Includes:
1 Hour of much needed Pampering:
Your choice of either

• Full Body Massage
• Rose Quartz Facial
• Manicure
• Pedicure
Using Ajala Natural Beauty products, which are manufactured through The Natural Beauty Retreat, using ingredients that are all natural and organic.

AND

Exclusive Card Making Class:
Includes materials to make a beautiful handmade box with 8 matching cards and envelopes whilst using gorgeous products from Stampin’ Up!

Learn some great new techniques. The day is suitable for Beginners right through to the experienced Paper Crafter.

To keep the day’s as relaxing and enjoyable as possible; there will be no more than 10 guests on each day. Call today to book as seats are limited.

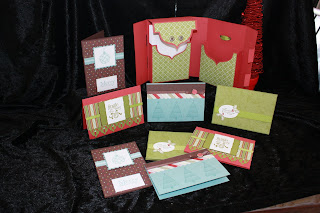
Below are the Projects in which you will be making with Julie.

Each person will make this beautiful Handmade Gift Box which you can reproduce and send to Family and Friends.
Also included are 8 beautiful Handmade Christmas Cards with Envelopes, in coordinating colours.


**as kits need to be made up in advance we ask that you please respond by the due dates listed below**

RSVP: Monday 16th November for the Retreat on Saturday 21st November And
RSVP: Monday 30th November for the Retreat on Saturday 5th December

Each person is required to bring there own basic tool kit which should include:
Ruler (with inches), Pencil, Rubber, Double Sided Tape or Tabs, Foam Dots, Scissors, Paper Trimmer, Cutting Mat, etc.

If you have any questions about anything above, please contact

Tina on 0438 505 544: The Natural Beauty Retreat
or
Julie on 0419 758 217: Independent Demonstrator Stampin’ Up!


Thanks Jules

LinkWithin

Related Posts with Thumbnails